
SignalTraffic Forums
For the discussion of Traffic Signals, Signs and other street furniture
CH Porthole Restore in Progress
Moderator: signalfan
43 posts
• Page 3 of 5 • 1, 2, 3, 4, 5
Re: CH Porthole Restore in Progress
![]() by jab8356 on Tue Jun 11, 2013 4:29 pm
by jab8356 on Tue Jun 11, 2013 4:29 pm
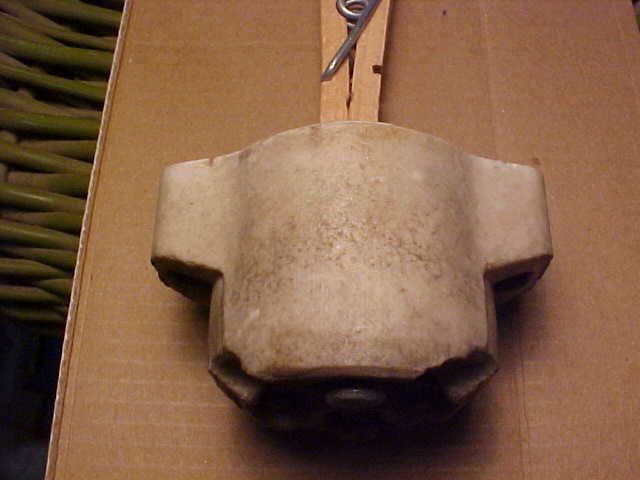
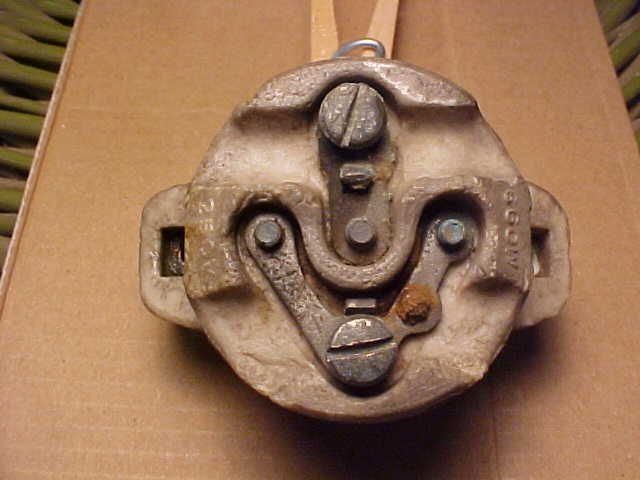
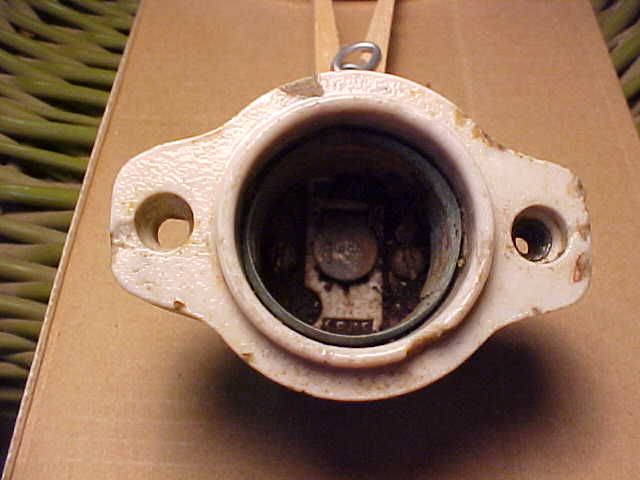
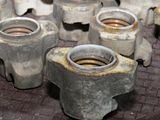
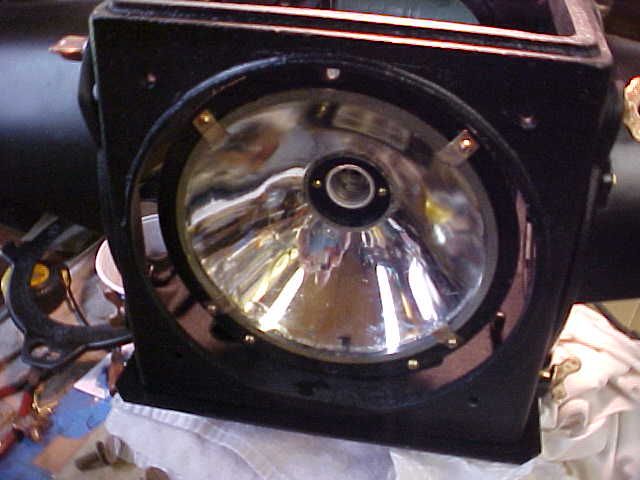
Here is the only good photo of the sockets I have. I do not have dimensions as I would have to tear apart a signal to get those. These are in my Harrington Seaberg 4 way, but the same sockets are used in my CH porthole.


-

jab8356 - Crusty Old Salt

- Posts: 3182
- Joined: Wed Aug 17, 2011 3:34 am
- Location: Macomb County, Michigan
Re: CH Porthole Restore in Progress
![]() by rustyfoot on Tue Jun 11, 2013 8:32 pm
by rustyfoot on Tue Jun 11, 2013 8:32 pm
Here are a couple of pictures of mine. Depth 1 1/2"...Diameter 1 1/2"..Center to Center on screw holes measures 1 3/4"
[imghttp://i1337.photobucket.com/albums/o663/rustyfoot/MVC-020S-2_zps50d6fcf3.jpg][/img]
[imghttp://i1337.photobucket.com/albums/o663/rustyfoot/MVC-020S-2_zps50d6fcf3.jpg][/img]
jab8356 wrote:Here is the only good photo of the sockets I have. I do not have dimensions as I would have to tear apart a signal to get those. These are in my Harrington Seaberg 4 way, but the same sockets are used in my CH porthole.
I need all the help I can get.. 
rustyfoot
Chris C
South Alabama
rustyfoot
Chris C
South Alabama
-

rustyfoot - Signal Crazy

- Posts: 231
- Joined: Sun Dec 02, 2012 10:05 pm
Re: CH Porthole Restore in Progress
![]() by Fred on Wed Jun 12, 2013 5:22 am
by Fred on Wed Jun 12, 2013 5:22 am
rustyfoot wrote:Hey Jerry,
Hope you are right about the sockets. If anybody knows let me hear from you please... jab8356 wrote:From my experience restoring my porthole, I learned that the sockets that were used in these signals are still made today. I do not know where to find them though. Jay might know.
I have some. $8 ea. plus shipping
Fred M. 90% of live is just showing up.

-

Fred - Crusty Old Salt
- Posts: 8274
- Joined: Sun Jul 01, 2007 11:28 am
- Location: Stafford County Virginia
Re: CH Porthole Restore in Progress
![]() by rustyfoot on Wed Jun 12, 2013 7:09 pm
by rustyfoot on Wed Jun 12, 2013 7:09 pm
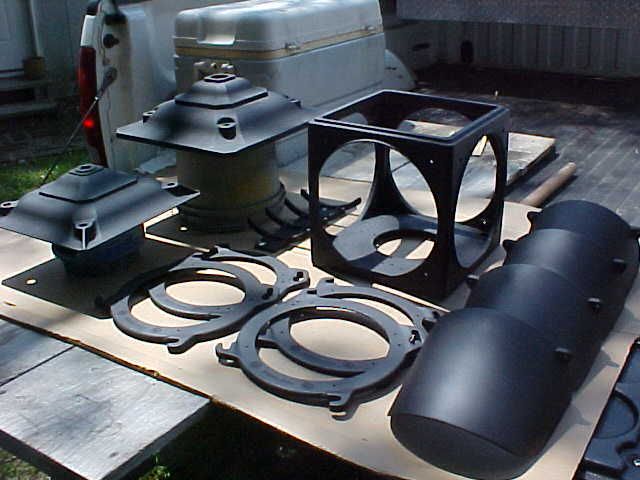
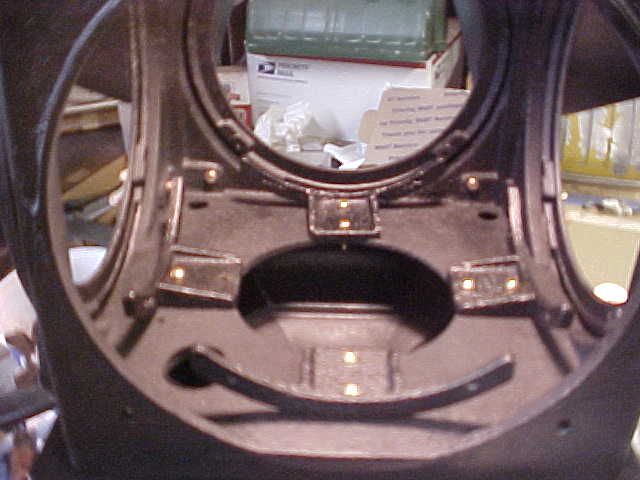
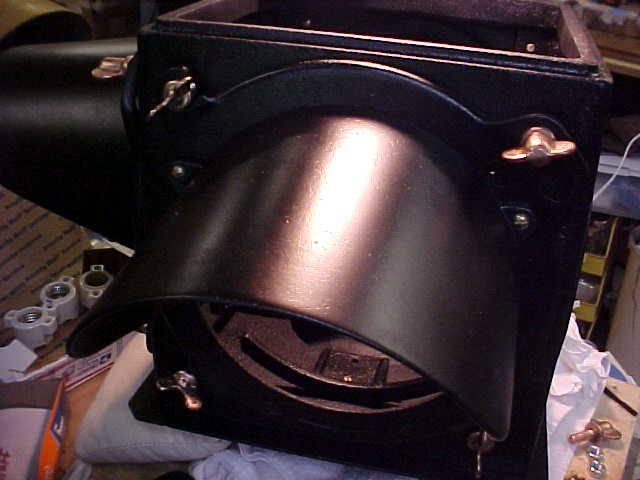
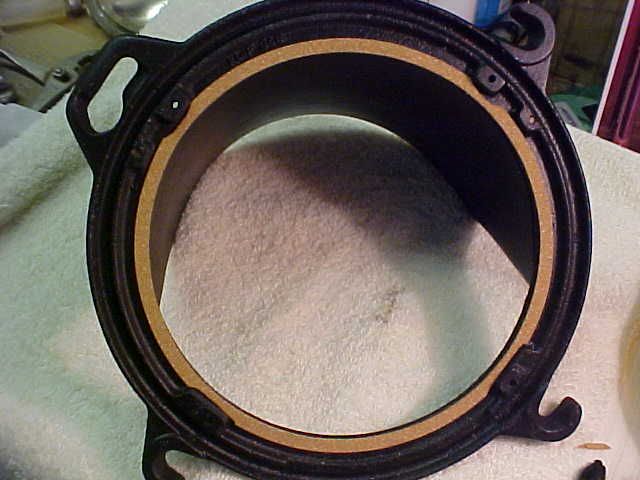
I spent the day sanding and priming the PH in grey high build primer. Then resanded and primed in black to make sure there would not be a shading problem when the final paint is applied. I've decided not to use a gloss black, instead I will go with a satin black. Gloss shows to much imperfections.. 
I need all the help I can get..
rustyfoot
Chris C
South Alabama
rustyfoot
Chris C
South Alabama
-
rustyfoot - Signal Crazy
- Posts: 231
- Joined: Sun Dec 02, 2012 10:05 pm
Re: CH Porthole Restore in Progress
![]() by jab8356 on Wed Jun 12, 2013 7:15 pm
by jab8356 on Wed Jun 12, 2013 7:15 pm
What did you do to repair the roof?
-
jab8356 - Crusty Old Salt
- Posts: 3182
- Joined: Wed Aug 17, 2011 3:34 am
- Location: Macomb County, Michigan
Re: CH Porthole Restore in Progress
![]() by rustyfoot on Wed Jun 12, 2013 9:49 pm
by rustyfoot on Wed Jun 12, 2013 9:49 pm
Hey Jerry,
I framed underneath with flat metal covered with wax paper so the Steel Stick would not stick. Then filled in with "Steel Stick". Keeping your fingers wet prevents them from sticking to the Steel Stick putty and makes it easier to smooth out and shape. After 20 minutes the Steel Stick is completely set up hard and can be filed, drilled or sanded. Once that is done I filled in tiny imperfections with bondo putty. Sanded out smooth and primed. This is a strong repair.
I framed underneath with flat metal covered with wax paper so the Steel Stick would not stick. Then filled in with "Steel Stick". Keeping your fingers wet prevents them from sticking to the Steel Stick putty and makes it easier to smooth out and shape. After 20 minutes the Steel Stick is completely set up hard and can be filed, drilled or sanded. Once that is done I filled in tiny imperfections with bondo putty. Sanded out smooth and primed. This is a strong repair.
jab8356 wrote:What did you do to repair the roof?
I need all the help I can get..
rustyfoot
Chris C
South Alabama
rustyfoot
Chris C
South Alabama
-
rustyfoot - Signal Crazy
- Posts: 231
- Joined: Sun Dec 02, 2012 10:05 pm
Re: CH Porthole Restore in Progress
![]() by LarryC39 on Wed Jun 12, 2013 10:39 pm
by LarryC39 on Wed Jun 12, 2013 10:39 pm
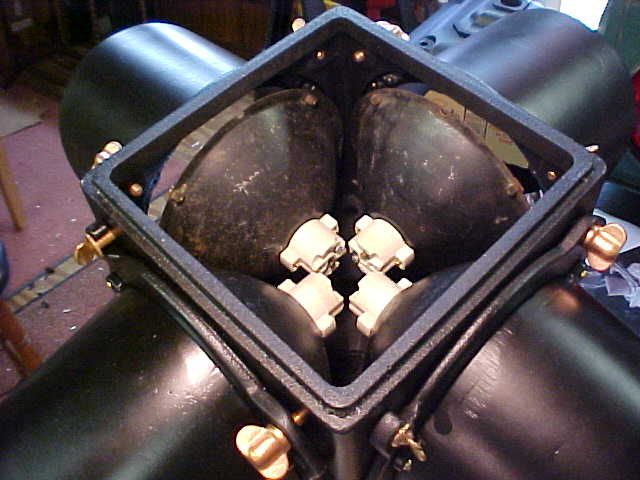
There's at least two styles of socket. Note the one in the foreground vs. the background.

#LC
I'm Moving! http://highwaydivides.com/
Lubrication
The right kind of slippery.
-Quote from The Book of DSM'13
I'm Moving! http://highwaydivides.com/
Lubrication
The right kind of slippery.
-Quote from The Book of DSM'13
-

LarryC39 - Wiki Mod

- Posts: 5567
- Joined: Sat Jul 07, 2007 10:43 pm
- Location: Detroit, MI
Re: CH Porthole Restore in Progress
![]() by rustyfoot on Wed Jun 12, 2013 10:56 pm
by rustyfoot on Wed Jun 12, 2013 10:56 pm
Mine is like the one in the foreground. 
LarryC39 wrote:There's at least two styles of socket. Note the one in the foreground vs. the background.
I need all the help I can get..
rustyfoot
Chris C
South Alabama
rustyfoot
Chris C
South Alabama
-
rustyfoot - Signal Crazy
- Posts: 231
- Joined: Sun Dec 02, 2012 10:05 pm
Re: CH Porthole Restore in Progress
![]() by rustyfoot on Thu Jun 13, 2013 7:55 pm
by rustyfoot on Thu Jun 13, 2013 7:55 pm
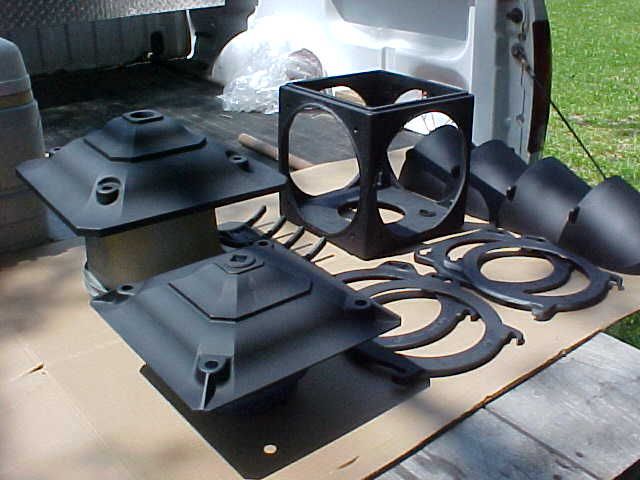
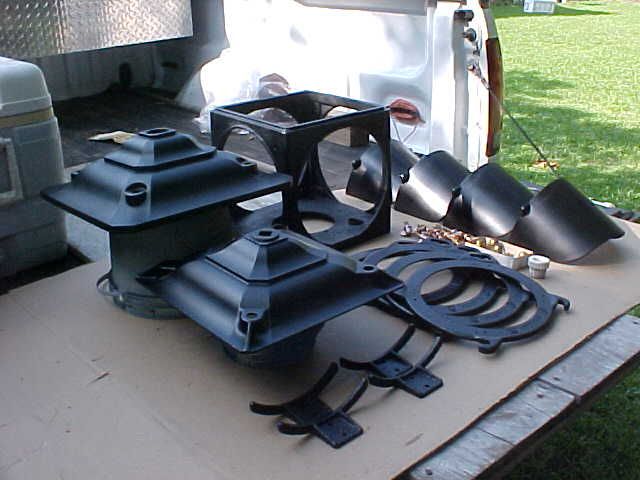
Adding a couple of more pictures of the PH all done in Satin black. Reassembly will begin soon...waiting on a few needed parts. 


I need all the help I can get..
rustyfoot
Chris C
South Alabama
rustyfoot
Chris C
South Alabama
-
rustyfoot - Signal Crazy
- Posts: 231
- Joined: Sun Dec 02, 2012 10:05 pm
Re: CH Porthole Restore in Progress-Final pictures
![]() by rustyfoot on Sun Jun 23, 2013 5:44 pm
by rustyfoot on Sun Jun 23, 2013 5:44 pm
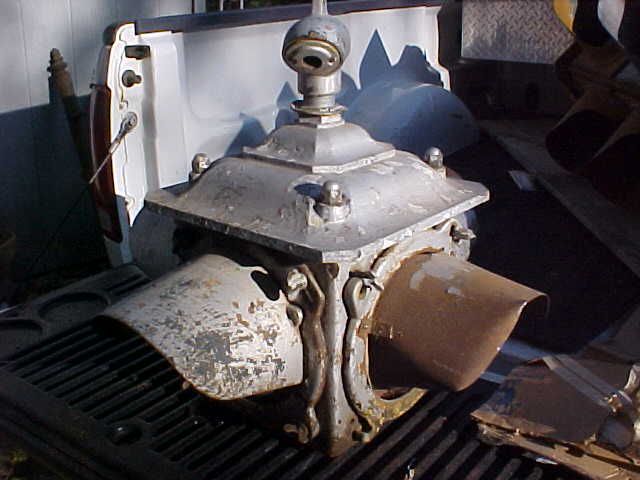
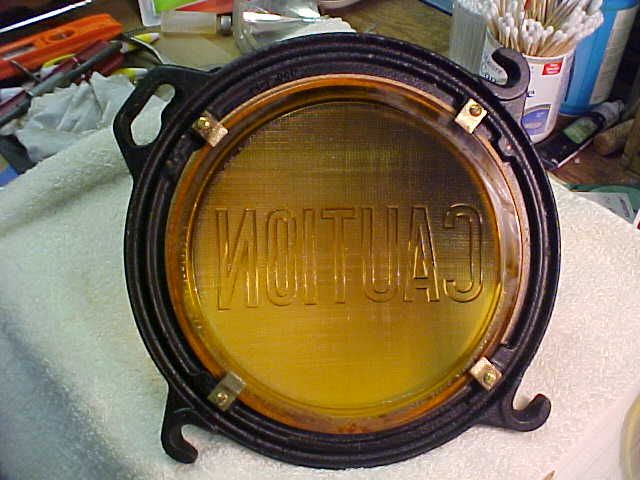
Here are some final pictures of the CH PH. And don't forget what it looked like to start!  This has been an extremely difficult project and definitely not the kind of project you want to run in to very often. I found a PH glass reflector in my stock and 2 caution command lens..one is perfect and the other has BB hole...It will do for the time being. UPS has reopened my claim for the 3 broken caution commands I am hopeful it will get paid..
  This beacon is so heavy I had to take pictures just where it sits. It is to heavy to hang from my shop ceiling so I plan to mount it on a wood swivel base(as shown) on top of my gun safe. This restore just about got the best of me, but UPS reopened my claim and got me energized again I will send the balance of pictures later tonight. Having problems with Photobucket.

This has been an extremely difficult project and definitely not the kind of project you want to run in to very often. I found a PH glass reflector in my stock and 2 caution command lens..one is perfect and the other has BB hole...It will do for the time being. UPS has reopened my claim for the 3 broken caution commands I am hopeful it will get paid.. This beacon is so heavy I had to take pictures just where it sits. It is to heavy to hang from my shop ceiling so I plan to mount it on a wood swivel base(as shown) on top of my gun safe. This restore just about got the best of me, but UPS reopened my claim and got me energized again I will send the balance of pictures later tonight. Having problems with Photobucket. I need all the help I can get..
rustyfoot
Chris C
South Alabama
rustyfoot
Chris C
South Alabama
-
rustyfoot - Signal Crazy
- Posts: 231
- Joined: Sun Dec 02, 2012 10:05 pm
43 posts
• Page 3 of 5 • 1, 2, 3, 4, 5
Who is online
Users browsing this forum: No registered users and 1 guest