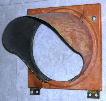
Here are a few pictures of the beacon as I found it. As you can see, it was a little worse for wear but under all the dirt, some rusted fasteners, and all the mud wasp nests, it was in fairly good condition. surprisingly enough, once I got past the filth, the beacon was actually in pretty nice shape.


As the disassembly began, it became evident that things weren't going to be as easy as I expected. The rods holding it together were aluminum and despite the application of plenty of heat and PB Blaster, and lots of patience on my part, any rods which weren't already broken did break when I tried to remove them. You will note that a rod or two was already broken before I began pulling the beacon apart. I was not surprised to find a few nests inside the beacon made by some resident mud wasps, but I was rather surprised to find a Darley flasher, probably a replacement scuttled from another signal from this formerly Darley filled town.


All the parts were washed, glass beaded, washed again, primed and painted before reassembly. New brass rods and cap nuts were installed as well as new hole plugs. The original fasteners were used wherever possible and most were repainted with the exception of the springs for the Dzus fasteners. The reflectors were cleaned with an etching automotive wheel cleaner. The sockets are the original Autoflow bakelite sockets and they were in such good shape that they required nothing more than a quick wipe clean before reassembly. The copper contacts were so clean that they looked like they were new. Before installing the original wiring, the clamps holding the sockets were soaked in naval jelly to remove the rust, most of it anyway. Although they were heavily pitted from the rust, they were still functional so I decided to keep the originals instead of replacing them with more modern clamps. The lenses are Kopp TL 4666 and appear to be original to the beacon.


All in all, I am happy with the results. Although the beacon was originally painted after it was assembled at the factory, I prefer to paint my parts individually before reassembly. Due to this, I will have a few minor areas to touch up over the weekend. Once the touch-ups are done the beacon will get a LTG flasher, unless I can locate an original flasher, and then she will take up residence somewhere in my home. I must say that I did have some doubts when I began this restoration as I wasn't sure if I wanted the beacon restored or left as it was when it was in service. Now that I have seen the results of the completed restoration, I think it was a wise decision to restore it.


 Cant wait to see it lit! Any luck reviving the Darley flasher?

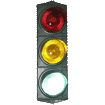

 I must post a pic of the beacon lit up in all her glory. Here's to you Dee, for unknowingly giving me a huge headache from such a ridiculously simple electrical circuit.