Econolite type F cabinet, sanded and ready for paint. My lovely wife sanded this thing for me, took her several hours! It was painted a sort of hunter green by the previous owner, but that paint was starting to chip so I decided to start over. It looks like this cabinet was once black.

2013-07-27 14.00.51 by dbsound06, on Flickr

2013-07-27 14.00.58 by dbsound06, on Flickr
Looks like it was also olive green at some point, with yellow primer perhaps?

2013-07-27 14.00.44 by dbsound06, on Flickr
The slipfitter was a NOS unit which I sanded down, as it was still shiny powdercoat black. The top cap is not exactly the right size, but it works all right. The 12" pipes are brand new, but the elbows (and all the other parts) are reclaimed. Elbows are marked "WARD".

2013-07-27 14.01.13 by dbsound06, on Flickr
The flanges are mismatched in brand but look virtually the same -- one is Band-It brand, from Denver CO, the other is some other variety. Elbows are Econolite branded. Once again, pipe is new.

2013-07-27 14.01.18 by dbsound06, on Flickr
Primer applied. I was disappointed overall in the quality of both the Krylon primer and the Italian Olive green spray paint I bought. The primer didn't spray, it just sort of splattered, and it seemed that some of the paint cans had a similar problem. I'm not sure if the cans had a defect, or if the paint was just really old (bought at Wal-Mart). It's also not super durable, as the later pics will show.

2013-07-27 15.22.31 by dbsound06, on Flickr
Primed cabinet. You can see how splotchy the paint is. It also didn't disperse very well, hence the "tiger stripes" on the back.

2013-07-27 15.22.52 by dbsound06, on Flickr
More primed parts. The controller banding brackets were purchased new from Alloy Castings. They're pretty good quality, but I was not super happy with the precision of the threaded mounting holes, more on that later...

2013-07-27 15.22.59 by dbsound06, on Flickr
I forgot to take more pictures of the painted parts, but in the mean time, late last week I got some Band-It banding and buckles from eBay, and tested them out with my tool, also from eBay. The process is actually pretty easy -- the tool is both a tensioner and a cutter.

2013-08-01 16.39.02 by dbsound06, on Flickr
(Slightly fuzzy) closeup of the tool at work. The "nose" at the front of the tool is also where the cutting blade is. The grooved part in the middle of the tool has a grip inside to hold onto the banding. The banding goes through both slots, then the handle part is screwed down, which pulls the banding outward. When the proper tension is achieved, you just push the long lever at the bottom of the picture outward to cut off the excess, then use a hammer to bend the leftover "tab" over the buckle. I did find that there is a bit of finesse to this -- too much tension and you can break the buckle
 , and if you don't make sure to bend the tool out perpendicular to the buckle before you cut it off, it can loosen before you get it fastened down, and there is no way to start over once you've cut off the end. (The tool tends to want to pull itself parallel to the banding as you work on it.)
2013-08-01 16.39.12 by dbsound06, on Flickr
Closeup of the front (cutting) edge of the tool levered against the buckle.

2013-08-01 16.39.20 by dbsound06, on Flickr
On Sunday, I finally put the Band-It tool to work, and mounted the cabinet to the pole. I was careful to line it up such that I could still mount a ped button in the existing holes on the pole. You can also see the rest of the painted parts waiting for the signals to arrive.

2013-08-04 17.00.10 by dbsound06, on Flickr
Overall the paint turned out all right, but it's not very durable. I put on 3-4 coats of paint alone over the course of a few days, and it has cured for at least 5 days before I mounted it all, but I can still easily knock the paint off.

2013-08-04 17.00.34 by dbsound06, on Flickr
Closeup of some paint carnage. In this case, the banding was not quite in the groove as I got it up to tension, so it slid along the bracket and stripped off the paint with it.

2013-08-04 17.00.47 by dbsound06, on Flickr
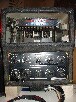
Back of controller, showing the banding holding the brackets. I'm glad I'm not OCD enough to try to line up all those buckles, the way the banding works you can't really slide it around once you start adding tension, so you pretty much just have to go with wherever it lands. And yes, I'm leaving the graffiti -- it adds character!

2013-08-04 17.00.57 by dbsound06, on Flickr
My thoughts so far:
-Krylon paints are not very high quality. I know others here have used the Italian Olive green paint from Krylon, I'd be interested to hear their thoughts. If I ever repaint this stuff, I will definitely just use a brush.
-Band-it can be tricky, but it's not terribly difficult, and I think I only have about $100 invested in 100' of strapping, 50 buckles (all 3/4"), and the tool combined. I like it because when I will need to move this pole, I can just cut all the straps and reassemble at its new location.
Later this week I hope to get the condulet installed -- I bought the wrong size hole saw the other day. Turns out the "diameter" of electrical conduit has nothing to do with its actual size.
 2" conduit turns out to have an OD of about 2.4", so I have to go exchange the 2" hole saw for a 2.5" one, and I also have to go to Graybar to get the conduit nipples -- no one else local carries ones that size for some reason.
I'm still waiting patiently for the signals to get shipped to me, but once they get here I will have everything I need to get this all wired up! Then, once I get my neon ped all working, I'll likely add it to this pole. I'll have to get some more signal arms to mount it first though, I've basically used up all of my spare hardware on this project.
More to come later this month!