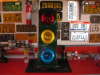
Recently I began trying my hand at something new that I have been wanting to do for a long time, casting metal so I can make my own signal parts. Lets face it, some parts you just aren't going to find for your signals anymore. I came across a post on CL about a small propane powered foundry for sale a few hours from here. It had been used only twice and it came with nearly everything I needed to start playing, including almost 100 pounds of brass ingots. I struck a deal and brought it home. Unfortunately, my dog Foxy passed away a couple of weeks ago and having the foundry was a therapeutic way for me to pass some time and keep my mind off of things while learning something new. Here are a few pictures from the first fire up. For the first firing I didn't put any metal into the crucible. I simply fired it up and waited for it to reach operating temperature.


After feeling comfortable with the furnace, I decided to add some aluminum to the crucible and get a feel for pouring some ingots. I purchased some junk cast aluminum auto parts from the local scrapyard and proceeded to cut them down in my horizontal band saw and feed them to the furnace. The little furnace was more than up to the task and had no trouble melting down the aluminum. The aluminum poured rather easily and was glowing red hot even through the steel trays that I used to form it into ingots.
So what happens to an old aluminum intake manifold from a '97 Ford Explorer when it is no longer needed? I send it to Hell.


The refractory in the furnace was glowing red hot during the melt. The refractory is a concrete based mixture used to insulate the furnace and keep the heat inside. Don't let that fool you though. Even with the heavy leather gloves I can't move the furnace for several hours after the burn.


*** Action shot for Troy ***


I know, I know....I shouldn't pour near the propane tank. It was my first time working with the metal and I wasn't thinking about safety as much as I should have been. I have since been much more cautious with placement of the propane tank in relation to the furnace and the area that I pour the metal in order to prevent any potential disasters. Kids, do not try this at home.

Molten aluminum ready to be poured. The dross has already been skimmed off the top.

Now that's hot!
 That picture was taken in total darkness. Ingots were glowing red hot after being poured.

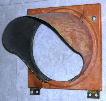
Now that I have melted metal and poured some ingots, I wanted to try to make a sand mold. I chose to use a Darley top for my first attempt at mold making for several reasons, but primarily that it was relatively flat and fit inside my flask. It wasn't perfect, but overall I was pleased with my efforts. Some sand broke out in a few places, but I expected things to be a lot worse than what really happened. All in all, I was very pleased. I now knew that I could accomplish making a mold with a little practice. This was good practice too because I will need a top for my post mount Harrington Seaberg 2-way.


So I've lit the furnace, melted aluminum, made ingots, and successfully made a sand mold. Now it was time to try a real pour.
I opted to try the Darley top again. I again made the mold and I was satisfied with the results after removing the top from the sand. I had to try it twice because again some sand broke out the first time I opened it. Making the mold is very labor intensive. I have a new found appreciation for the cost of having a commercial foundry make parts.


Now for the pour and the break out...


I see aluminum in there!


And now for the results....


Was this a successful first pour even though the aluminum did not completely fill the mold? I think it absolutely was. I have examined the resultant pour and I was able to identify my mistakes. There was plenty of aluminum left in the crucible, but my pour set before it could completely fill the mold, hence the section that is missing from the top. If you look closely, you can actually see where the aluminum in the middle set before the East side of the top was filled. The remaining molten aluminum tried to unsuccessfully encircle the solidifying center.
I have several changes that I am going to make to correct my mistakes on the next pour and I suspect that I will have better results. Larger flat type parts are somewhat difficult to pour. In terms of what a beginner should try, I have set my personal bar a little high with a Darley/Seaberg type top, but I wanted a challenge. I am going to try again in a day or two. I was however, very satisfied with the detail of the casting. It had crisp edges, sharp details, and it otherwise looked very good. Had it been a better pour, I would have had no qualms about using it on my signal. I even placed it on top of a Darley 4-way and it seemed to fit fairly well.
In the near future, I am going to try to cast parts that I need for other restorations, both aluminum and brass. I will keep everyone posted on my results. I am planning on making replacement corners for my Harrington Seaberg post mount base shown below. It will be a multi-step project requiring mold making and casting to get a good sample corner that I can place in a sand mold for recasting of a replacement corner. I am looking forward to it a great deal. With the exception of the actual welding, I plan to do everything myself.


 That is going to come in handy.